Sunday, October 11, 2020

[IT System Administration][BasicTools]

Hi Techies,

Based on my past and current experiences with system administration, I just wanted to list some useful and very basic tools I have liked or make use on a daily basis to ease my life and be more efficient:

        1.  mRemoteNG - a go-to tool in which I configure all of my servers which can be accessible with just a mouse-click
            [https://mremoteng.org/download]
2.  Keypass -  a primordial password management tool which helps to never forget or remember a password
3.  Greenshot - very powerful screenshot tool useful for documenting 
4.  Notepad++ - copy-paste / coding languages / jotting down random stuffs 
5.  Microsoft OneNote - essential for a good task planning and all data entered are automatically saved

These are some of my basic and current favorites, to be surely updated throughout time. 
I would want to know which one are your favorites and the new trends going on ;)

Wednesday, July 22, 2020

[Linux]Installation of Linux Mint alongside Windows10

Hello Techies,

Here I am again, but with the Installation of Linux Mint which I really wanted to install and use some time back since I really liked its easy to use features and also for troubleshooting.
Previously, I installed Zorin OS but did not like it personally ((to each her own taste!!)) :D

Installation Instructions :

1. Download link is available at : https://www.linuxmint.com/download.php

2. Make flashdisk bootable with Linux Mint ISO mentioned earlier in another post  how to make a flash disk bootable

3. Insert the flashdisk and click on function key F12, depending on the model of the pc. Mine is a dell, therefore I entered boot mode by pressing F12 key.

4. Next is to choose Linux Mint 19.3 Cinnamon which appears on the screen as below :

5. The Linux Operating System gets launched and the following screen is displayed :

6. Double- click on the 'Install Linux Mint' icon:

7. Installation begins. Select English and click on Continue :

8. Select English(US) and click on Continue :

9. Configuring Wireless Connection. Select Connect to this network and choose a network. Click on Next :

10. Enter password for chosen Wi-Fi Network :

11.Click on Continue :

12. Select Something else and click on Continue :

13. I wanted to write over the partition where I installed Zorin OS, therefore I selected that partition :

14. Click on Continue :

15. Select the newly formatted partition and click on Install Now :

16. Select country and click on Continue :

17. Enter personal details as follows and click on Continue :

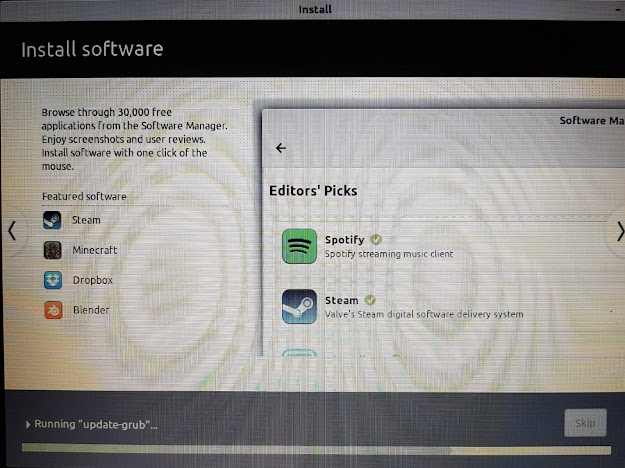
18. Linux Mint will take a few minutes before getting installed and few varying screens will appear on the screen as shown below. Note the progress bar :


19. Upon completion of the installation, the following dialog box appears 'Installation Complete' :

20. Reboot PC and choose Linux Mint 19.3 Cinnamon :

21. Welcome screen appears and OS is ready to be used :


Linux Mint Installation is really as simple as that if all the instructions are carried out properly.
So, now you can use this flavor of Linux and refine your Linux skills. :)


Wednesday, June 17, 2020

[Windows Server 2019][Set up a file server][Step by step Guide]

Hello Techies,

This tutorial aims at helping out to turn a Windows Server 2019 into a file server.
Firstly, I will create a share folder and secondly deploy the file server role.

Steps are as follows :

1. Start by creating a folder on the C drive or which ever location you like best

2. Right-click on the newly created folder and go to the Sharing tab
3. Click on Advanced Sharing
4. Check the box : Share this folder
5. Click on Permissions
6. If you want a group or a user to have a specific access to that folder, you can define it in the permissions box below. Click Add >> OK
7. The network path is created
8. On Server Manager, click on Add Roles and Features > Next
9. Click on Next
10. Click on Next
11. Select File and Storage Services > Next
12. Click on Next > Install
 13. On Server Manager, in the left-hand panel, File and Storage Services option will be added
14. Verify that the shared folder is listed

Thanks.

Friday, June 12, 2020

[Windows Server 2019][Set up a web server][Step-by step Guide]

Hello Techies,

Below are the steps to set up a web server in Windows Server 2019 and also to test with a default site:

1.Click on add roles and features
 2. Click on Next
 3. Click on Next
 4. Click on Next
 5. Select Web Server (IIS)
6. Click on Add Features
 7. Click on Next
 8. Click on Next
 9. Click on Next
 10. Click on Next
 11. Click on Yes
 12. Click on Install
 13. Wait till installation process to complete

Adding a default site for testing😀
14.Click on Tools > Internet Information Services (IIS) Manager
 15. Unroll the arrow as shown
 16. Click on Sites
 17. Click on Default Sites
 18. Right-Click on Default Web Sites > Manage Website
 19. Click on Default Document
 20. Move up index.htm
 22. Browse the website
 23. The test webpage is now shown , it means the website is set up


Thanks!!


[Coding with python][Installing Flask App]

  I am trying website coding with Python to better organise my tools. For starters, I installed Flask. Below are the commands that I am usin...